 Paste Special
- General Overview
- Step-By-Step
- Tips and Tricks
- Related Tools
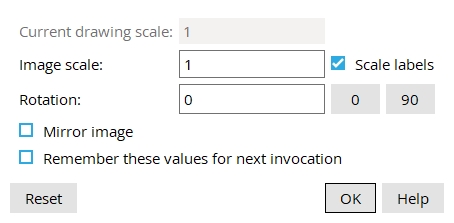
Current drawing scale: read-only. This is the scale of your current drawing, the drawing you are pasting the objects to.
Image scale: The scale you want applied to the copied objects, the scale is applied immediately when you press Tab or left-click (Locate).
Objects not affected by Image scale: The sizes of labels , piecemarks , section sizes , pointer arrowheads , dimension terminals and workpoint symbols are independent of the image scale. The sizes of labels and dimension labels can be changed using
Scale labels or on their edit windows.
Tip: You may want to make the Image scale match the Current drawing scale.
Scale labels: ![]() or
or ![]() . This applies only if you changed the Image scale. The scale is immediately applied to the copied objects when you press Tab.
. This applies only if you changed the Image scale. The scale is immediately applied to the copied objects when you press Tab.
If this box
If the box
is not checked, the labels on the copied objects remain at the original scale.
Rotation: Any positive or negative angle from -360 to 360 degrees. The rotation is applied to the copied objects immediately when you press Tab.
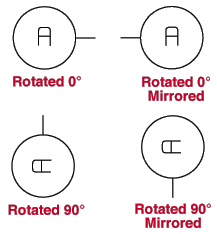
A positive number rotates the copied objects counterclockwise that number of degrees.
A negative (-) number rotates the copied objects clockwise that number of degrees.
If this box
If the box
Remember these values for next invocation: ![]() or
or ![]() . This affects whether or not the settings on this window are remembered the next time you use Paste Special during the current session of Drawing Editor.
. This affects whether or not the settings on this window are remembered the next time you use Paste Special during the current session of Drawing Editor.
If this box
If the box
Reset reverts the settings on the Paste Special window back to the settings when the Paste Special window is opened.
Default settings: Image scale matches the Image scale. Rotation is set to 0. Mirror image and Remember these values are unchecked.
OK (or the Enter key) closes this window but does not end the operation. The preview remains on screen, and Locate - Pan - Return mouse remain active.
Left-click ( Locate ) adds the copied items.
Right-click ( Return ) ends this operation.
1 .Use Copy, Cut, Copy with Reference Point, or Cut with Reference Point before you can perform this operation.
2. Click the Paste Special icon, which is pictured above. The icon can be found on the Drafting page > Clipboard section.
Alternative: Invoke Paste Special using the context menu (right-click) and selecting Special > Paste Special.
Learn more about alternative methods for launching commands.
3. The status line prompts you to place the reference point, drag the mouse pointer to the desired location of the copied objects and left-click (Locate).
Alternative: Press Esc or right-click (Return) to the end the command at any time.
Tip: At any time while this command is active, you can set the Scale, Rotation, and if you want the objects mirrored as shown in the General Overview tab.
4. The command stays active as you can add multiple of the copied objects. To end the command, press Esc or right-click (Return).

